

Article by
Jake Blasco, SHSS, B-2 Licensed Contractor
Jake Blasco is a Senior Home Safety Specialist® (SHSS), B-2 Licensed Residential Remodeling Contractor, and Grab Bar Specialist serving homeowners throughout Southern California. He specializes in aging-in-place modifications, grab bar installation, bathroom safety upgrades, accessibility remodeling, fall prevention solutions, and ADA-inspired home modifications. Through Blueprint Kitchen & Bath Design Studio, Jake helps seniors, veterans, and individuals with mobility challenges remain safe, independent, and comfortable in their homes. His expertise includes bathroom safety assessments, walk-in shower conversions, accessible design, railings, ramps, and other home accessibility solutions that improve quality of life while supporting long-term independence.
Every year, countless bathroom falls happen not because people are careless, but because their shower simply wasn't designed with safety in mind. If you've been wondering about the best grab bar placement in your shower, you're already thinking about this the right way — and that instinct matters more than you might realize.
You already know that a wet shower floor is one of the most hazardous surfaces in any home. That concern is completely valid, and it's shared by families and individuals across every stage of life. The good news is that the right grab bar placement doesn't just reduce risk; it actively restores confidence, supports independence, and transforms your shower into a space that works with your body rather than against it.
In this guide, you'll learn exactly where grab bars should be positioned for maximum support, what height and angle standards to follow, and how to ensure your installation meets accessibility best practices. Whether you're planning a modification for yourself or a loved one, this comprehensive breakdown gives you the clarity to make decisions that are both safe and lasting.
Key Takeaways
- Understanding the best grab bar placement in your shower — including height, angle, and location — is the foundation of a safer, more confident bathing experience.
- Grab bars come in vertical, horizontal, and angled configurations, and each type serves a distinct purpose depending on the movement it's designed to support.
- ADA compliance guidelines provide clear, research-backed standards for grab bar installation that apply to home modifications, not just public facilities.
- Improper installation can be more dangerous than having no grab bar at all — professional installation ensures your bars are anchored securely into wall studs or blocking.
- The right grab bar setup does more than prevent falls; it preserves independence and transforms your shower into a space that supports your daily routine at every stage of life.
Understanding Grab Bars: Importance and Types
A grab bar is exactly what its name suggests: a fixed, load-bearing support rail installed in the shower or bathroom that a person can grip during movement. That simple definition, however, understates how much functional value these fixtures deliver. When positioned correctly as part of a thoughtful best grab bar placement shower strategy, they become the difference between a hazardous routine and a confident, independent one.
Why Grab Bars Are Essential for Safety
The bathroom is consistently identified by safety researchers as one of the highest-risk rooms in the home, with the shower and bathtub area posing particular hazards due to wet surfaces and the physical demands of stepping, turning, and lowering the body. According to the Centers for Disease Control and Prevention (CDC), bathroom falls send hundreds of thousands of Americans to emergency rooms each year, with older adults facing the most serious consequences, including fractures and long-term mobility loss.
Grab bars address this risk by giving the body a stable anchor point at exactly the moments it needs one: when stepping over a threshold, shifting weight while washing, or steadying a stance on a slick surface. For seniors and individuals managing conditions like arthritis, joint instability, or post-surgical recovery, that anchor isn't a luxury. It's what makes independent bathing possible.
Types of Grab Bars: Which One to Choose?
Not every grab bar serves the same purpose, and choosing the right type is just as important as choosing the right location. Here's how the primary configurations differ:
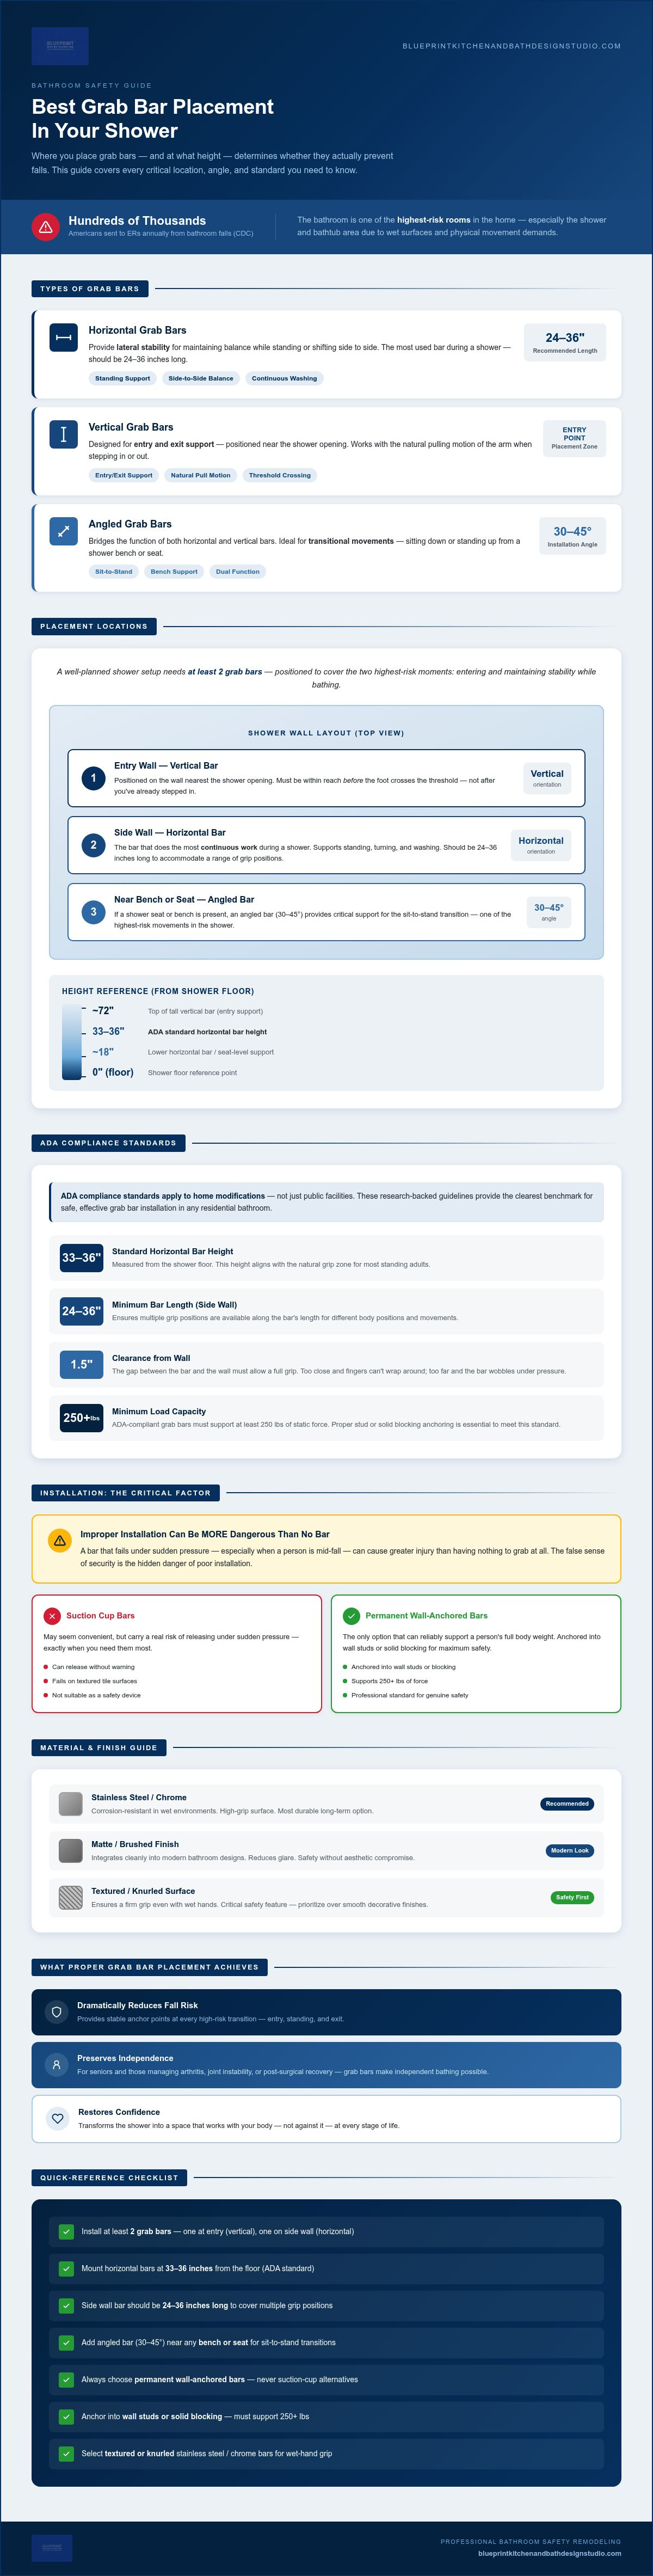
- Horizontal grab bars provide lateral stability and are most effective for maintaining balance while standing or shifting side to side. They're a core component of any well-planned shower safety setup.
- Vertical grab bars are positioned for entry and exit support, giving users something to grip while stepping in or out of the shower. They work with the natural pulling motion of the arm rather than against it.
- Angled grab bars (typically installed at 30 to 45 degrees) bridge the function of both horizontal and vertical bars, supporting transitional movements like sitting down or standing up from a shower bench.
Beyond orientation, installation method matters significantly. Permanent, wall-anchored grab bars are the only option that can reliably support a person's full body weight during a fall or stumble. Suction-cup grab bars may seem convenient, but they carry a real risk of releasing under sudden pressure, which is precisely when a secure hold is most critical. For any installation intended to provide genuine safety, permanent mounting into wall studs or solid blocking is the standard professionals follow.
Material and finish choices, while often treated as purely aesthetic decisions, also contribute to function. Stainless steel and chrome finishes offer corrosion resistance in wet environments, while textured or knurled gripping surfaces ensure a firm hold even with wet hands. Matte and brushed finishes integrate cleanly into modern bathroom designs, making it straightforward to prioritize safety without compromising the look of your space.
Best Practices for Grab Bar Placement in the Shower
Knowing that grab bars matter is only half the equation. Where you place them, and at what height, determines whether they actually support the movements that create risk. Getting the best grab bar placement shower strategy right means thinking through each transition point in your routine: entry, standing, washing, and exit. Each moment has its own demand on your balance, and each deserves a deliberate answer.
Recommended Locations for Grab Bars
A well-planned shower setup typically calls for at least two grab bars, positioned to cover the two highest-risk moments: entering and maintaining stability while bathing.
- Entry wall grab bar: This bar belongs on the wall nearest the shower opening, positioned vertically or at a slight angle. It gives the user something firm to grip while stepping over a threshold or transitioning from a dry floor to a wet one. Placement within easy reach before the foot crosses the entry point is critical; a bar that requires you to lean into the shower to grab it defeats its purpose entirely.
- Side wall grab bar: Once inside, a horizontal bar mounted on the side wall provides the lateral stability needed for standing, turning, and washing. This is the bar that does the most continuous work during a shower, and it should be long enough, typically 24 to 36 inches, to accommodate a range of grip positions.
- Additional placements for larger or walk-in showers: Curbless and walk-in shower designs often benefit from a third bar, particularly if a built-in bench is present. An angled bar near the seating area supports the sit-to-stand transition, which places significant demand on the lower body and core. Larger shower footprints may also warrant a bar on the back wall to anchor the user while reaching for fixtures.
Height Considerations for Optimal Use
The ADA establishes horizontal grab bar placement at 33 to 36 inches above the shower floor for standing use. That range reflects the natural grip height for most adults and aligns with the elbow position during a supportive grip. For users who are shorter or taller than average, adjusting within a few inches of that range to match the individual's standing elbow height produces a more intuitive and effective hold.
Seated use follows different logic. A bar intended to assist someone using a shower bench should be mounted closer to 33 inches, allowing a comfortable grip during the lowering and rising motion without requiring an awkward reach. Vertical entry bars are typically centered between 44 and 48 inches to serve the widest range of users.
One practical tip: before finalizing any placement, simulate the movement the bar is meant to support. Stand or sit in position, reach naturally, and mark where your hand falls. That point, not a generic measurement on a chart, is where your bar belongs.
Placement decisions also need to account for wall structure. A grab bar installed at the perfect height but anchored only into drywall offers a false sense of security. Proper installation into wall studs or solid blocking is what converts a well-placed bar into a genuinely reliable support. If you're planning a modification and want to ensure every detail is handled correctly, working with a certified specialist like the team at Blueprint Kitchen and Bath Design Studio ensures your installation meets both safety standards and your specific needs.
ADA Compliance and Bathroom Safety
The Americans with Disabilities Act established accessibility standards that most people associate with public buildings, ramps, and parking spaces. What fewer people realize is that those same standards contain detailed, research-backed specifications for grab bar installation that translate directly and usefully into residential settings. Following ADA guidelines in your home isn't a bureaucratic exercise; it's a shortcut to proven safety engineering that removes the guesswork from your best grab bar placement shower decisions.
Understanding ADA Guidelines
For shower grab bars, ADA standards specify more than just height. The full picture includes bar diameter, clearance from the wall, load capacity, and surface texture requirements. Here's what those standards actually require:
- Bar diameter: Between 1.25 and 2 inches, sized to allow a full, secure grip without the hand slipping around or straining to close.
- Wall clearance: A minimum of 1.5 inches between the bar and the wall surface, giving the hand room to grip without knuckles pressing against tile.
- Load capacity: Bars must be able to support 250 pounds of force in any direction. This is why wall anchoring into studs or solid blocking isn't optional — it's the structural foundation of compliance.
- Surface texture: Non-slip gripping surfaces are required to maintain hold under wet conditions.
- Horizontal bar height: 33 to 36 inches above the floor for standing use, consistent with what was covered in the placement section above.
One common misconception worth addressing directly: ADA compliance in a private home isn't legally required the way it is for commercial or public facilities. But that distinction doesn't make the standards any less relevant. They were developed through extensive research into how people actually move, grip, and recover balance, and those biomechanical realities apply in your shower just as much as in any public restroom.
Integrating Compliance with Design
A persistent myth holds that grab bars look institutional, that adding them means sacrificing the aesthetic quality of a well-designed bathroom. That simply isn't true anymore. Today's compliant grab bars are available in brushed nickel, matte black, polished chrome, and oil-rubbed bronze finishes, with clean geometric profiles that integrate naturally into contemporary and transitional bathroom designs. Selecting a finish that matches your existing fixtures is often all it takes to make safety hardware feel like a deliberate design choice rather than an afterthought.
The more meaningful design challenge isn't finish selection; it's ensuring that bars are positioned where they're structurally sound without compromising the visual flow of the space. That's where professional expertise earns its value. A certified specialist understands how to locate studs and blocking behind finished tile, plan bar placement that honors both safety standards and spatial aesthetics, and deliver an installation that looks intentional because it was. Blueprint Kitchen and Bath Design Studio's certification as a Senior Home Safety and Grab Bar Specialist reflects exactly this kind of integrated expertise, combining technical compliance with the design sensibility that high-quality home modifications deserve.
Professional Grab Bar Installation: Why It Matters
Choosing the right locations for your grab bars is a decision that requires knowledge and careful planning. But even the most thoughtful best grab bar placement shower strategy delivers zero safety benefit if the installation itself fails. A bar that pulls free from the wall under pressure isn't just unhelpful; it's actively dangerous, creating a false point of confidence at exactly the moment a person needs real support.
The Risks of DIY Installation
The most common DIY mistake isn't carelessness. It's anchoring into drywall instead of structural material. Tile and drywall alone cannot support the sudden lateral or downward force of a person catching themselves mid-fall. A bar needs to be fastened into wall studs or solid blocking, and locating those anchor points behind finished tile requires experience and the right tools. Without them, even a properly positioned bar becomes a liability.
Other frequent errors include:
- Using undersized hardware: Standard screws aren't rated for the load demands of a safety grab bar. Proper installation requires hardware designed to meet the 250-pound force requirement that ADA standards specify.
- Incorrect bar orientation: Mounting a horizontal bar where a vertical or angled one is needed undermines the biomechanical logic of the placement entirely.
- Inadequate waterproofing at penetration points: Every hole drilled through tile is a potential water intrusion point. Improper sealing leads to structural damage behind the wall over time, weakening the very anchor points the bar depends on.
The consequences of these mistakes range from a bar that gradually loosens over months to one that fails suddenly. Neither outcome is acceptable when the person relying on it may be mid-transfer or off-balance.
Finding a Certified Installer
Credentials matter here in a way they don't for every home improvement project. A certified Senior Home Safety and Grab Bar Specialist has been trained specifically in the intersection of mobility needs, structural requirements, and accessibility standards. That's a different skill set than general contracting, and it produces a different quality of outcome.
When evaluating a potential installer, ask these questions directly:
- Do you hold a recognized certification in grab bar or aging-in-place installation?
- How do you locate studs and blocking behind finished tile?
- What load rating do your installations meet, and how is that verified?
- Can you show examples of completed installations in homes similar to mine?
For homeowners in Redlands and the surrounding area, working with a local specialist who understands both the technical requirements and the personal significance of these modifications makes a real difference. Blueprint Kitchen and Bath Design Studio holds SHSS certification as a Senior Home Safety and Grab Bar Specialist, bringing that focused expertise directly to residential projects in the region. Contact Blueprint Kitchen and Bath Design Studio to discuss a grab bar installation that's built to last and designed around how you actually move.
Conclusion: Enhancing Safety with Grab Bars
Getting the best grab bar placement shower strategy right is one of the most practical investments you can make in your home. It's not about acknowledging limitation. It's about building a bathroom that supports how you actually live, move, and age, without compromising the space you've worked to create.
Throughout this guide, the core principles have remained consistent: placement matters as much as presence, structural anchoring is non-negotiable, and ADA-informed standards exist because they reflect real human biomechanics. A bar mounted at the wrong height, in the wrong orientation, or into the wrong wall material doesn't just underperform; it introduces a new risk where you were trying to eliminate one.
The benefits of a well-executed installation extend beyond fall prevention. Residents and families consistently report that properly placed grab bars restore a sense of ease to daily routines that had begun to feel uncertain. That confidence compounds over time. A shower that felt risky becomes one that feels manageable, then routine, then simply normal. That shift in daily experience is the real outcome of thoughtful grab bar placement.
A few principles worth carrying forward:
- Position bars around movement, not convenience. Entry, standing stability, and seated transitions each require a distinct support point. One bar rarely covers all three.
- Don't let aesthetics become a barrier. Modern grab bars integrate cleanly into well-designed bathrooms. Safety and style aren't competing priorities.
- Trust the standards. ADA specifications exist because they were developed around how bodies actually move under stress. Following them in a residential setting is simply good engineering.
- Prioritize professional installation. The placement decision and the installation quality are equally important. One without the other leaves the job half done.
If you're ready to move from planning to action, working with a certified specialist ensures that every detail is handled correctly from the start. Blueprint Kitchen and Bath Design Studio holds SHSS certification as a Senior Home Safety and Grab Bar Specialist, serving homeowners in Redlands and the surrounding area with the technical expertise and design sensibility these modifications deserve.
Your bathroom should work for you at every stage of life. Contact Blueprint Kitchen and Bath Design Studio to schedule a consultation and take the next step toward a safer, more confident daily routine.
Take the Next Step Toward a Safer Shower
Getting the best grab bar placement shower strategy right comes down to three things: knowing where support is actually needed, following standards that reflect real biomechanics, and ensuring every bar is installed into solid structural material. Done correctly, the result isn't just a safer shower. It's a bathroom that works with you, not against you.
Blueprint Kitchen and Bath Design Studio brings SHSS certification as a Senior Home Safety and Grab Bar Specialist to every project, combining technical precision with genuine local expertise in Redlands and the surrounding area. That means your installation is anchored properly, positioned purposefully, and designed to last.
You don't have to navigate these decisions alone. Contact Blueprint Kitchen and Bath Design Studio today for professional grab bar installation in Redlands and take a confident step toward a bathroom that supports your independence every single day.
Frequently Asked Questions About Grab Bar Placement in the Shower
What is the best height for grab bars in the shower?
For standing use, horizontal grab bars should be mounted 33 to 36 inches above the shower floor. This range aligns with the natural elbow height of most adults and supports a firm, comfortable grip. For seated use near a shower bench, positioning closer to 33 inches works best. Vertical entry bars are typically centered between 44 and 48 inches to accommodate the pulling motion used when stepping in or out.
That said, the most effective approach is to simulate the movement the bar needs to support before finalizing placement. Reach naturally from a standing or seated position and mark where your hand falls. That point, specific to your body and your routine, is your true target height.
How many grab bars should I install in my shower?
Most showers benefit from at least two grab bars: one near the entry point and one on the side wall for standing stability. A third bar is worth considering if your shower includes a bench, since the sit-to-stand transition places real demand on the lower body and deserves its own dedicated support. Larger walk-in showers may also benefit from a bar on the back wall for stability while reaching fixtures.
The right number isn't about excess; it's about covering each distinct transition point in your routine. Entry, standing balance, and seated movement each carry their own risk, and each deserves a purposeful answer.
Can grab bars be installed in any type of shower?
Grab bars can be installed in most shower configurations, including tile enclosures, fiberglass units, and curbless walk-in designs. The critical variable isn't the shower type; it's what's behind the wall. Bars must be anchored into wall studs or solid blocking to meet the load requirements that make them genuinely safe. Fiberglass and acrylic surrounds may require backing panels to provide adequate anchoring points.
Curbless showers and walk-in designs often offer more flexibility in bar placement since there's no threshold to work around. A certified installer can assess your specific wall construction and recommend the right anchoring approach for your shower type before any drilling begins.
What are the benefits of professional grab bar installation?
Professional installation ensures your bars are anchored into structural material, not just drywall or tile, which is the difference between a bar that holds and one that fails under sudden pressure. A certified installer also knows how to locate studs behind finished tile, seal penetration points to prevent water intrusion, and orient each bar to match the specific movement it's designed to support.
Beyond structural integrity, professional installation through a specialist like Blueprint Kitchen and Bath Design Studio brings SHSS certification to the project, meaning the work reflects both safety standards and the nuanced understanding of how people actually move in a shower environment. That expertise is difficult to replicate through a DIY approach.
Are there specific grab bars for seniors?
There aren't grab bars marketed exclusively to seniors, but certain features make a meaningful difference for older adults. Textured or knurled gripping surfaces maintain hold with wet hands, which is especially important for individuals with reduced grip strength. Bars with a diameter between 1.25 and 2 inches, the range ADA standards specify, are sized for a secure, full-hand grip without strain.
For seniors managing arthritis or joint instability, angled bars that support transitional movements like sitting and standing are particularly valuable. The best grab bar placement shower strategy for an older adult accounts for these transitions specifically, rather than focusing only on standing balance.
How do I ensure my grab bars are securely installed?
Secure installation comes down to two things: proper anchoring and appropriate hardware. Bars must be fastened into wall studs or solid blocking, and the hardware used needs to be rated for the load demands of a safety application. ADA standards require grab bars to withstand 250 pounds of force in any direction, a threshold that standard household screws and drywall anchors simply can't meet.
After installation, a properly anchored bar shouldn't flex, rotate, or shift when firm pressure is applied. If there's any movement at all, the installation needs to be reassessed. Periodic checks every few months are a simple habit that catches any loosening before it becomes a safety issue.
What materials are best for grab bars?
Stainless steel is widely regarded as the most durable option for shower environments because it resists corrosion and maintains its structural integrity under repeated wet and dry cycles. Chrome-plated and brushed nickel finishes offer similar corrosion resistance and integrate cleanly into a range of bathroom designs. Avoid bars with purely decorative finishes that may degrade over time in a high-moisture environment.
The gripping surface matters as much as the base material. Textured or knurled finishes provide reliable traction with wet hands, which is exactly when a secure hold is most critical. Today's options span matte black, polished chrome, and oil-rubbed bronze, so choosing a material that performs well doesn't require compromising the look of your bathroom.


